Smarter Money Suite
All-in-one institutional toolkit combining market structure, advanced FVG classification, projected price blocks, and supply/demand pressure clouds.
Components
4-in-1
Markets
All
Style
Overlay
Alerts
16+


Overview
Smarter Money Suite is the flagship indicator -a comprehensive Smart Money Concepts system that combines four institutional trading tools in a single overlay. Market Structure tracks Break of Structure and Change of Character events with multiple confirmation modes. The FVG engine classifies Fair Value Gaps into seven distinct subtypes with lower-timeframe refinement for precision entries. Institutional Price Blocks detect order block patterns at structure breaks and project target zones using proprietary extension logic. The Supply/Demand Pressure Cloud identifies zones from structural patterns and extends gradient-shaded pressure regions to visualize how far each zone's influence reaches. Instead of juggling multiple indicators, get everything you need to trade like smart money in one powerful package.
How It Works
Smarter Money Suite combines four institutional trading components into a single overlay. The Market Structure engine uses a configurable swing detection system to identify pivot highs and lows, then tracks Break of Structure (BoS) and Change of Character (ChoCh) events in real time. Three confirmation modes are available: default structure breaks, ATR-based delayed confirmation that requires a candle close beyond an ATR threshold, and ATR-based early breaks that confirm as soon as price exceeds the threshold.
The FVG engine identifies Fair Value Gaps and classifies them into seven distinct subtypes -- standard, one-directional, retracing, engulfing, reversing, long-tail, and balancing -- each representing a different institutional footprint. Lower-timeframe refinement narrows each gap to its most precise boundaries for tighter entries. The Institutional Price Blocks component detects order block candle patterns at confirmed structure break points and projects target zones using the same proprietary extension logic found in the standalone indicator.
The Supply/Demand Pressure Cloud rounds out the suite by identifying zones from structural patterns and extending gradient-shaded pressure regions from each zone's edge. Together, these four components give you a complete institutional framework: structure tells you the trend direction, FVGs reveal where imbalances exist, price blocks show where institutions are positioned, and pressure clouds visualize how far each zone's influence reaches.
Key Features
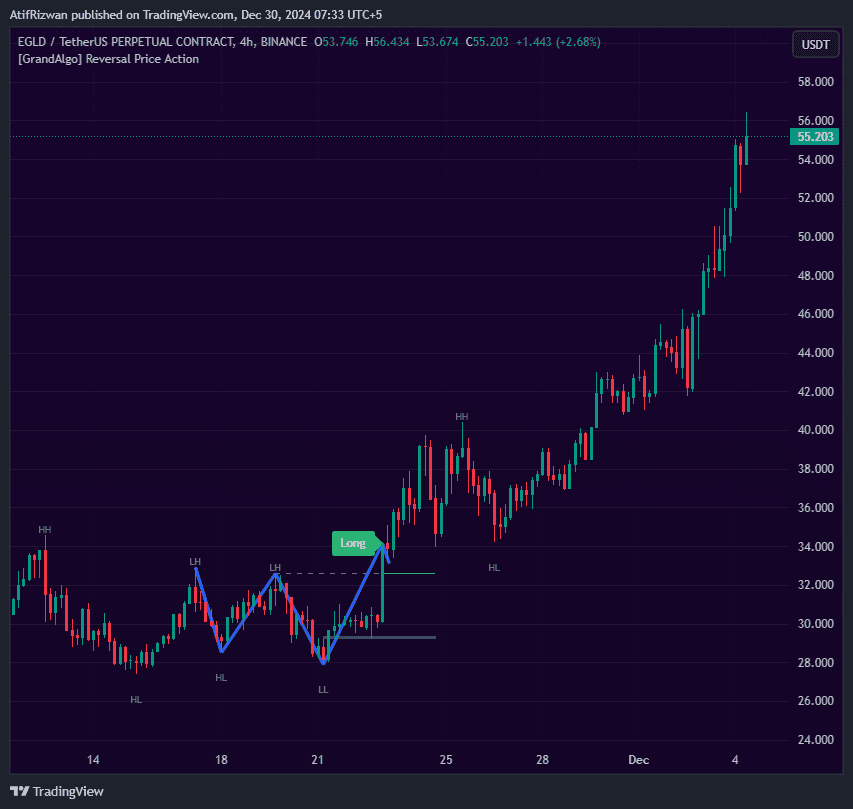
Market Structure (BoS & ChoCh)
Tracks Break of Structure and Change of Character in real-time with multiple confirmation modes for different trading styles.
7-Type FVG Classification
Identifies standard, one-directional, retracing, engulfing, reversing, long-tail, and balancing Fair Value Gaps -each toggleable with lower-timeframe refinement.
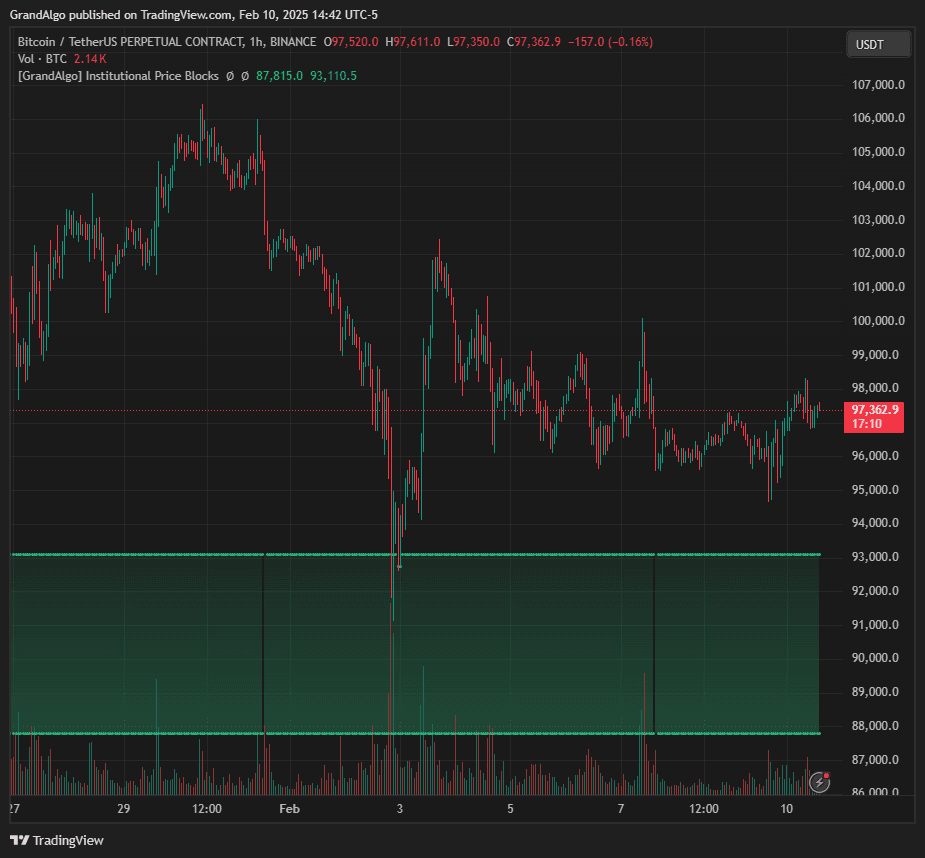
Institutional Price Blocks
Detects order block patterns at structure breaks and projects target zones using proprietary extension logic for institutional-level entries.
Supply/Demand Pressure Cloud
Identifies supply and demand zones from structural patterns and extends gradient-shaded clouds to visualize how far each zone's pressure reaches.
Common Trading Setups
Practical ways to trade with Smarter Money Suite.
ChoCh + FVG Precision Entry
Catch trend reversals early by combining a Change of Character event with a classified Fair Value Gap for a high-confluence entry.
- 1Wait for the Market Structure component to print a ChoCh label, signaling the first break against the prevailing trend.
- 2Identify a Fair Value Gap that formed during or immediately after the ChoCh displacement move.
- 3Note the FVG subtype -- retracing and standard FVGs tend to offer the cleanest entries on retests.
- 4Enter when price retraces into the FVG zone. If lower-timeframe refinement is enabled, use the refined boundaries for a tighter entry.
- 5Place your stop-loss beyond the ChoCh swing point and target the next structural level in the new trend direction.
BoS Continuation with Price Block Target
Trade with the trend by entering at a price block after a Break of Structure confirms trend continuation, using the block's projected target zone as your exit.
- 1Confirm the trend direction by observing consecutive BoS events in the same direction.
- 2After a BoS, look for an institutional price block that formed at the swing point responsible for the break.
- 3Wait for price to retrace into the price block zone.
- 4Enter in the trend direction with a stop-loss beyond the block's invalidation boundary.
- 5Use the block's projected extension zone as your primary take-profit target.
Supply/Demand Cloud + FVG Confluence
Identify zones where supply/demand pressure clouds overlap with Fair Value Gaps for the highest-probability reversal entries.
- 1Scan for areas where a pressure cloud and an unmitigated FVG overlap on the chart.
- 2The overlap zone represents double institutional interest -- both structural supply/demand and a price imbalance.
- 3Wait for price to enter the overlap zone and show a reaction (wick rejection, engulfing candle, or momentum shift).
- 4Enter in the direction suggested by the zone type (long at demand + bullish FVG, short at supply + bearish FVG).
- 5Target the opposite zone type or the next significant structural level.
Settings Reference
Key settings you can configure in TradingView. See the full setup guide for detailed walkthroughs.
| Parameter | Type | Default | Description |
|---|---|---|---|
| Market Structure Mode | string | Close | Swing detection method for structure analysis: Close uses closing prices for precise breaks, High/Low uses wicks for broader detection. |
| Structure Length | int | 5 | Lookback for swing detection. Lower values catch more structure events; higher values focus on major pivots only. |
| FVG Types | multi-toggle | All enabled | Toggle each of the 7 FVG subtypes independently: Standard, One-Directional, Retracing, Engulfing, Reversing, Long-Tail, and Balancing. |
| FVG LTF Refinement | bool | false | Refines FVG boundaries using a lower timeframe for more precise entry zones. |
| Price Block Levels | string | Alpha | Projection mode for institutional price blocks: Alpha and Beta use different calculation approaches for target zones. |
| Price Block Clouds | string | Both | Controls gradient cloud display: Both, Primary only, Secondary only, or None. |
| Supply/Demand Strength | string | Minor | Zone detection sensitivity: Major for precise levels, Intermediate for moderate, Minor for broader detection. |
| Supply/Demand Pressure | string | Strong | How far the gradient cloud extends from each supply/demand zone. |
Pro Tips
Don't Enable Everything at Once
Start with Market Structure + FVGs. Once comfortable, add Price Blocks. Finally add Supply/Demand Clouds. Layering gradually prevents information overload.
Use Close-Based Structure for Precision
Close-based swing detection produces fewer but more reliable structure events. Use High/Low mode only if you need broader swing detection for volatile instruments.
Combine FVG Types for Insight
Not all FVGs are equal. Retracing FVGs offer clean pullback entries. Engulfing FVGs show aggressive continuation. Learning to read the subtype improves entry quality significantly.
Match Strength Settings to Timeframe
On lower timeframes, use Minor strength for Supply/Demand and shorter Structure Length. On higher timeframes, increase both for cleaner signals with less noise.
Frequently Asked Questions
No. Each component (Market Structure, FVGs, Price Blocks, Pressure Cloud) can be toggled independently. You can start with just Market Structure and FVGs, then add components as you become comfortable. The indicator is designed to be modular so you only see what you need.
The seven subtypes are: Standard (classic 3-candle gap), One-Directional (all candles moving the same way), Retracing (gap forms during a pullback), Engulfing (the gap candle engulfs the prior), Reversing (gap forms at a reversal point), Long-Tail (significant wick showing rejection), and Balancing (gap that fills a prior imbalance). Each is toggleable -- most traders start with Standard and Retracing enabled, then experiment with others.
When set to Delayed Confirmation, a structure break is only valid if the candle closes beyond the swing level by at least the ATR threshold (ATR multiplied by your ATR Factor). This reduces false breaks during choppy markets. Early Breaks mode confirms as soon as price exceeds the ATR threshold on any tick, which is faster but carries more risk of false signals. The ATR Factor input (default 0.2) controls how far beyond the level price must reach.
You can, but it is generally unnecessary. The suite contains the same algorithms as the standalone Institutional Price Blocks and Supply Demand Pressure Cloud indicators. Running both would produce duplicate zones. The main reason to use a standalone version is if you want a cleaner chart focused on just one component.
Get access to Smarter Money Suite
Included with every subscription plan alongside all 18 premium indicators. Subscribe today for just $19/mo.
Related Articles
Related Indicators
More tools in Smart Money Concepts View all Smart Money Concepts →